Do you know how to use a disc sander? We figured that you don’t. That’s why we came up with a five-step guide to proper disc sander use. Take advantage of this guide and start using your disc sander the correct way.
Step 1 – Wear Safety Gear
As with every type of equipment use, it’s important always to consider wearing safety gear. Before using your disc sander, you should put on your safety gloves and goggles as they will protect both your hands and eyes from any sharp wooden debris or dust particles. Always wear them whenever you operate your disc sander. Also, you should not wear any loose clothing. Instead, wear an apron and hold back any loose clothing that you’re wearing and tie it back.
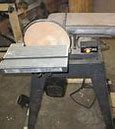
Step 2 – Set Up the Sander
Proper disc sander use always involves setting it up the right way. Place your disc sander in a space with less traffic or clutter. Make sure it’s an open space that you can move around. That way, you won’t bump into other people while you’re using this delicate machine. Before turning it ‘on,’ make sure the guar, which is the protective shield that covers the circular sander, is active and in place. You should also check if the dust extractor unit is fully connected. If not, affix it to the disc sander as it will be responsible for extracting any dust particles during the sanding process.
Step 3 – Prepare the Material
 The get the best result, always mark the specific areas on the material you want to sand. These marks will serve as a guide that will help you determine if you’ve reached the desired area or shape you want.
Step 4 – Switch Your Disc Sander On
Once everything is in place, and you’re all set, you can now turn your disc sander on. Wait for until it reaches full speed before using. When you turn your disc sander on, you will notice that the sander rotates in a counterclockwise motion. That means you should only use the left portion of your disc sander.
Step 5 – Using Your Disc Sander
When in use, always keep your fingers at least four inches away from your disc sander. Always take note of where you place your fingers while using your sander. Place the material you’re sanding on the work table. Lightly push it against the rotating disc and let it do the work; move the piece from left to right all at the same time. Try not to push the material too hard as it can affect the result.
Finally, always keep the material moving. Otherwise, friction between it and sander will cause it to blacken. Once you’re satisfied with the results, you can then remove the material and set it aside.
Congratulations, you now know how to execute proper disc sander use. For more tips just like this, visit our website and access our blog page.